
Do I need to choose XS, S or M when buying NAILINK EVERYDAY?
No. Each EVERYDAY box includes 24 nails across all 12 sizes, with two pieces of each size. Choose your design and shape, then dry-fit the included pieces to select ten for your hands.
Fit guide
NAILINK EVERYDAY includes 24 nails in 12 sizes, two of each. Compare shape-specific size charts, then dry-fit both hands to choose your ten pieces.
Quick answer
Every NAILINK EVERYDAY box contains 24 press-on nails across 12 sizes, with two pieces of each size. You do not choose an XS, S or M set at checkout. Use the chart for your chosen shape as a reference before buying, then dry-fit the included pieces on both hands and select your ten before applying jelly tabs.
NAILINK EVERYDAY fit reference
Shopping Rosé Cat Eye? Its Medium Almond fit has a separate measurement chart. The box includes 24 nails in a full-size set, with no size selection at checkout. Open Rosé Cat Eye and choose Check your fit. Use that chart for Rosé rather than one of the four charts below.
The four fits shown below contain 24 press-on nails across 12 numbered sizes, with two pieces of each size. The chart dimensions differ by shape, so use the row for the shape on the product rather than carrying one size number across every profile.
The ranges below summarise the smallest and largest pieces in each current chart. Width is a useful starting point, but curvature still decides whether a piece can rest evenly. Dry-fit the actual piece and compare its neighbour before applying adhesive.
Why can “Extra Short” show a longer chart range than “Short”? Shape names are not a length ranking across different shapes. These spans cover every size in each chart, not the same finger at a matched width. Compare individual pieces at a similar width and check the free edge on your own hand. Total tip length is not the length that extends beyond your fingertip.
These are published product dimensions, not Australian nail-bed population data or newly verified curvature measurements. Keep straight-width and surface-arc readings separate; no radius or fit percentage is inferred.
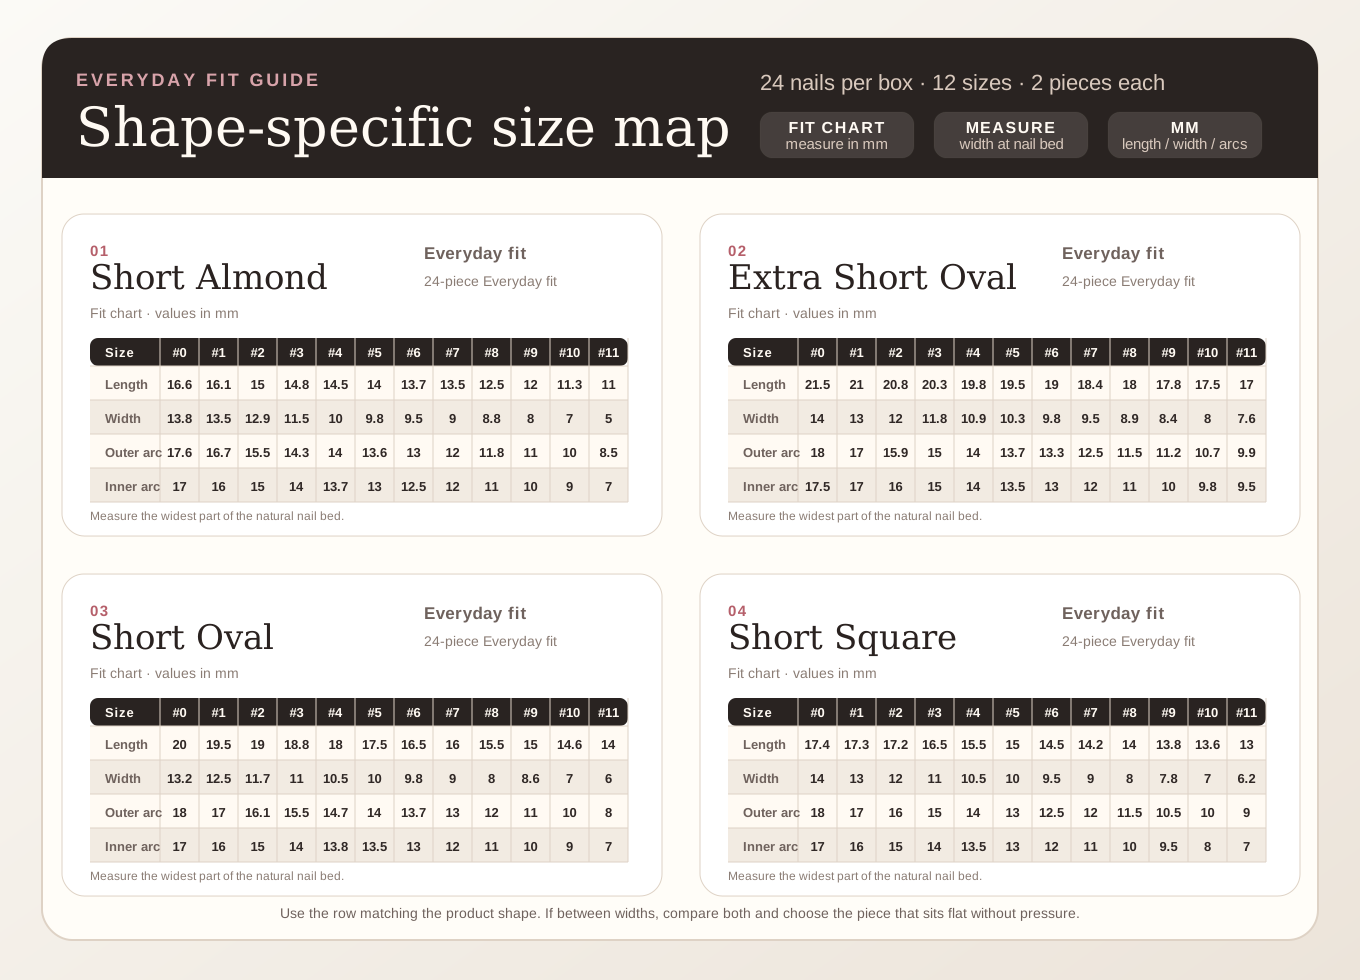
| Shape | Included sizes | Chart width span | Chart length span |
|---|---|---|---|
| Short Almond | #0–#11 | 5–13.8 mm | 11–16.6 mm |
| Extra Short Oval | #0–#11 | 7.6–14 mm | 17–21.5 mm |
| Short Oval | #0–#11 | 6–13.2 mm | 14–20 mm |
| Short Square | #0–#11 | 6.2–14 mm | 13–17.4 mm |
If two pieces look close, compare both. Choose the piece that covers the visible nail plate, sits flat without rocking and does not press into skin. A slightly wider piece may be refined carefully at the side edge before application; a narrow piece cannot add missing coverage.
One box includes all 12 numbered sizes, #0–#11, with two pieces of each size: 24 nails in total. Choose your design and shape; you do not need to select a fixed XS/S/M set.
Once you have the box, lay the pieces out, compare neighbouring sizes on each finger and select ten that fit both hands. The other pieces are alternative sizes, so 24 nails does not necessarily mean two complete wearable sets for your particular hands.
Keep the numbered pieces together so you can compare the neighbouring widths. All 12 sizes are already in the box.
Rest the piece over the natural nail without adhesive. Choose coverage from sidewall to sidewall without pressure, rocking or skin contact. Matching fingers on opposite hands can need different sizes.
Arrange them in left-hand and right-hand order before using the prep pad or jelly tabs. Check that your chosen combination fits comfortably rather than forcing a spare size to work.
Press-on size numbers are useful for keeping a set organised, but the real test is how each piece meets your nail. Place an unglued press-on over the natural nail and look straight down. It should cover the visible nail plate from one sidewall to the other without resting on the surrounding skin.
Check every finger independently. The same numbered size may not suit the same finger on both hands, and thumbs often need the most careful comparison. Keep the pieces laid out in right-hand and left-hand order once you have chosen them.
Compare the neighbouring sizes before reaching for a file. If the smaller piece leaves a visible strip of natural nail or feels as though it is squeezing the sides, try the larger piece. A slightly wider piece can be refined carefully at the side edge, but a piece that is too narrow cannot make full, relaxed contact.
Make any adjustment before applying adhesive. Use a fine nail file at the side edge, take off very little at a time and keep checking the fit. Do not thin the centre of the press-on or file aggressively around the natural nail.
Shape and curvature matter as well as width. If several sizes all rock or pinch, that style may not match your nail curve. A shorter, softer-flex profile can reduce leverage in daily use, but it still needs a compatible fit.
Once all ten sizes are arranged, wash and dry your hands and remove surface oil with the supplied alcohol prep pad. Match each jelly tab to the natural nail, smooth it flat, then position the selected press-on close to—but not on—the cuticle.
Sizing first prevents a common problem: preparing one finger, applying immediately and discovering later that a neighbouring piece would have sat better. A few extra minutes of dry fitting usually makes the complete set easier to apply.
Copy this blank table into your notes. Write the brand, shape and measurement method above it. Keep measured width separate from the tip number you actually chose; a good fit in one shape does not guarantee the same number fits in another.
| Finger | Left: width (mm) / chosen tip | Right: width (mm) / chosen tip |
|---|---|---|
| Thumb | ____ / ____ | ____ / ____ |
| Index | ____ / ____ | ____ / ____ |
| Middle | ____ / ____ | ____ / ____ |
| Ring | ____ / ____ | ____ / ____ |
| Little finger | ____ / ____ | ____ / ____ |
If you need more than two pieces of one numbered size to fit both hands, check the box contents and ask about options before buying. Do not force a neighbouring size simply to complete the set.
You do not need to submit ten measurements or choose a size bundle to buy NAILINK EVERYDAY. If you want to compare your nails with the published chart before ordering, use the notes below. Actual dry fitting remains the final check.
You need a millimetre ruler, a pen and a thin strip of paper or clear tape. Measure bare nails so an existing enhancement does not change the reading. First check how the seller defines width: a straight measurement and a measurement following the nail curve are different. Do not swap one for the other.
Look across the natural nail from one sidewall to the other. Measure the nail itself, not the surrounding skin. Check both hands; matching fingers can differ.
For a surface measurement, lay a thin strip of paper or tape gently over the widest part, following the curve without stretching it. Mark the two side edges, flatten the strip and read the distance on a millimetre ruler. Label this a surface-arc measurement. If the seller asks for straight width, follow that method instead.
Use the chart for the exact shape and product you plan to buy. If its measurement method is unclear, ask the seller before using your reading to choose a fixed-size set. Do not convert millimetres into a universal XS, S or M.
Lay each press-on over its nail without pressing it into shape. It should cover side to side, sit clear of skin and feel relaxed. Compare neighbouring sizes; width alone cannot confirm a curvature match.
For NAILINK EVERYDAY, use the shape-specific reference above and dry-fit the included pieces. The published dimensions are a starting point, not a promise that a measured natural nail will fit a particular numbered tip.
No. A size label only makes sense with the seller’s own chart. A number stamped on a tip helps you find the same piece again; it is not a standard millimetre measurement across brands or shapes.
| Label or measurement | What to check before buying |
|---|---|
| XS / S / M / L set | Read the seller’s five-finger measurements and confirm whether both hands can be specified. Do not choose by hand size alone. |
| A numbered tip, such as #0 or #5 | Check the brand and shape. The same number can describe different dimensions in another chart. |
| Width in millimetres | Check whether the chart uses straight width or a surface-arc measurement; also assess curvature. |
| NAILINK EVERYDAY 24-piece box | There are two pieces of each of 12 numbered sizes. Dry-fit all ten fingers; check that enough pieces fit your actual size pattern. |
Frequently asked questions
No. Each EVERYDAY box includes 24 nails across all 12 sizes, with two pieces of each size. Choose your design and shape, then dry-fit the included pieces to select ten for your hands.
Not necessarily. The 24 pieces include different sizes, with two of each size. How many pieces fit depends on your fingers. They are size options, not a guarantee of two complete wearable sets.
Do not assume so. NAILINK EVERYDAY has a separate chart for each shape. Record the shape alongside your chosen numbers and recheck when changing profiles.
Choose the piece that covers the nail from sidewall to sidewall without pressure. If the smaller size pinches or leaves the side exposed, use the next size and carefully refine its side edge before application if needed.
You can make a small adjustment at the side edge with a fine file before applying. Remove very little at a time and keep checking the fit rather than reshaping the whole piece.
A width or curvature mismatch, skin contact, surface oil or a folded adhesive tab can all interrupt contact. Recheck the dry fit and preparation instead of adding force.
Size every finger independently. Thumbs commonly need the widest pieces, and the same finger on each hand does not have to use the same number. Keep a left-hand and right-hand size note for the next wear.
Continue learning